-
CustomView - BottomNavigationView안드로이드 2019. 4. 14. 17:24
Intro
안드로이드 스튜디오에는 다양한 뷰를 제공을 합니다.
TextView, EditText, ImageView, FloatingActionBar, BottomNavigationView 등등 많은 수의 뷰들을 제공합니다.
하지만 이러한 뷰들은 기본적으로 제공이 되어 쉽게 적용이 가능하지만, 새롭고 특이한 UI등을 적용하기 위해서는 어느정도 커스터마이징이 필요하게 됩니다. 이번에는 이러한 View들 중 BottomNavigationView를 커스터마이징 하려고 합니다.

Custom BottomNavigationView 저는 이러한 커스텀뷰를 개발한 적이 없기 때문에, 구글링을 통해서 곡선을 활용한 커스텀뷰를 제작하는법에 대해서 찾아보았습니다.
구글링 결과, 베지어 곡선을 활용하여 개발할 수 있었습니다.
베지어 곡선(Bézier curve

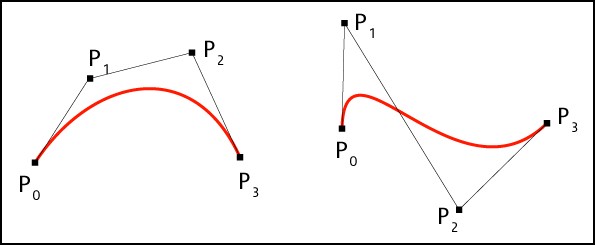
4개의 Control Point(P0,P1,P2,P3)를 가집니다. 첫번째 점(P0)과 마지막 점(P3)은 곡선의 시작점과 종료점을 의미하며,
두번째 점(P1)과 세번째 점(P2)는 곡선의 방향을 결정합니다.
이제 이러한 베지어 곡선을 가지고 코드로 어떻게 작성되는지 보도록 하겠습니다.
Custom BottomNavigationView
가장 먼저 BottomNavigationView를 Cutomizing 하기 위해서 BottomNavigationView를 상속받은 CustomBottomNavigationView Class를 생성합니다.
class mCustomBottomNavigationView @JvmOverloads constructor( context: Context, attrs: AttributeSet? = null, defStyleAttr: Int = 0 ) : BottomNavigationView(context, attrs, defStyleAttr) { private var mPath = Path() private var mPaint = Paint() init { mPaint.style = Paint.Style.FILL_AND_STROKE mPaint.color = Color.WHITE setBackgroundColor(Color.TRANSPARENT) } }코드를 보면 init에 Path와 Paint 객체만 선언한 걸 볼 수 있습니다.
Path 객체의 역할은 도형을 그리기 위해 경로를 저장하는 역할을 가지고 있습니다. 기본적으로 두점간의 경로들을 포함하고 있으며 사각형 모양의 BottomNavigationView를 곡선이 포함된 모양으로 다시 그리기 위해 필요합니다.
Paint객체는 Path객체가 가지고 있는 경로에 대한 정보를 어떠한 style과 색으로 그릴지 결정하는 역할을 합니다. Paint style은 3가지로 이루어져 있습니다.
- 외곽선만 그리기
- 외곽선을 제외하고 내부만 채우기
- 외곽선 + 내부 둘다 그리기
또한 도형의 배경색을 투명으로 지정합니다.
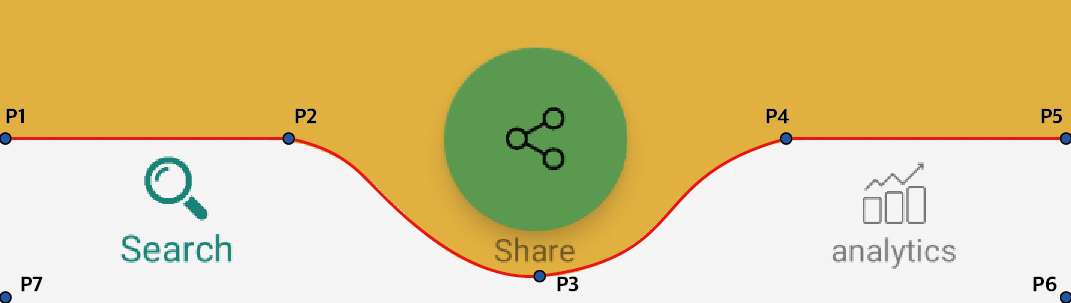
Point Of View View는 총 7개의 Point로 이루어져있습니다. 각각의 Point의 위치는 View의 width와 height에 영향을 받습니다.
P1은 View의 Path가 시작하는 곳의 위치입니다.
P2는 첫번째 곡선이 시작되는 곳의 점입니다.
깃허브 예제의 경우 FAB의 사이즈에 비례해 곡선의 크기를 능동적으로 조절하지만, 그렇지 않은경우에는 수동으로 비교해보면서 조절해야합니다.
P3는 첫번째 곡선이 끝나는 지점이자 두번째 곡선의 시작점입니다.
P4는 두번째 곡선이 끝나는 곳의 점입니다.
이제 곡선을 계산하고 그리는 작업을 진행하게 되는데 onDraw()메서드의 경우, 빈번하게 호출이 되는데 같은 작업을 빈번하게 진행하는 것은 퍼포먼스에 영향을 주기 때문에 onSizeChanged() 작업 내에서 계산 작업을 진행할 것입니다.
override fun onSizeChanged(w: Int, h: Int, oldw: Int, oldh: Int) { super.onSizeChanged(w, h, oldw, oldh) navWidth = width navHeight = height firstCurveStartPoint.set((navWidth / 2) - circleSize - (circleSize / 2), circleSize / 2) firstCurveEndPoint.set(navWidth / 2, circleSize + circleSize / 4) secondCurveStartPoint = firstCurveEndPoint secondCurveEndPoint.set((navWidth / 2) + circleSize + (circleSize / 2), circleSize / 2) firstCurveControlPoint1.set( firstCurveStartPoint.x + circleSize - (circleSize / 4), firstCurveStartPoint.y ) firstCurveControlPoint2.set( firstCurveEndPoint.x - circleSize + (circleSize / 4), firstCurveEndPoint.y ) secondCurveControlPoint1.set( secondCurveStartPoint.x + circleSize - (circleSize / 4), secondCurveStartPoint.y ) secondCurveControlPoint2.set( secondCurveEndPoint.x - circleSize + (circleSize / 4), secondCurveEndPoint.y ) }이 부분이 조금 복잡할 수 있는데 생각보다 쉽게 생각하시면 됩니다.
- firstCurveStartPoint.set : P2 점
- firstCurveEndPoint.set, secondCurveStartPoint : P3 점
- secondCurveEndPoint.set : P4 점
- FirstCurveControlPoint1.set : 첫번째 곡선의 첫번째 방향점
- FirstCurveControlPoint2.set : 첫번째 곡선의 두번째 방향점
- SecondCurveControlPoint1.set : 두번째 곡선의 첫번째 방향점
- SecondCurveControlPoint2.set : 두번째 곡선의 두번째 방향점
    override fun onSizeChanged(w: Int, h: Int, oldw: Int, oldh: Int) {
        super.onSizeChanged(w, h, oldw, oldh)

        //Point Calculation

        mPath.reset()
        mPath.moveTo(0f, (circleSize / 2).toFloat())
        mPath.lineTo(firstCurveStartPoint.x.toFloat(), firstCurveStartPoint.y.toFloat())

        mPath.cubicTo(
            firstCurveControlPoint1.x.toFloat(), firstCurveControlPoint1.y.toFloat(),
            firstCurveControlPoint2.x.toFloat(), firstCurveControlPoint2.y.toFloat(),
            firstCurveEndPoint.x.toFloat(), firstCurveEndPoint.y.toFloat()
        )

        mPath.cubicTo(
            secondCurveControlPoint1.x.toFloat(), secondCurveControlPoint1.y.toFloat(),
            secondCurveControlPoint2.x.toFloat(), secondCurveControlPoint2.y.toFloat(),
            secondCurveEndPoint.x.toFloat(), secondCurveEndPoint.y.toFloat()
        )

        mPath.lineTo(navWidth.toFloat(), (circleSize / 2).toFloat())
        mPath.lineTo(navWidth.toFloat(), navHeight.toFloat())
        mPath.lineTo(0f, navHeight.toFloat())
        mPath.close()

    }
위의 중요 점들의 위치를 지정하고 난뒤, 그려질 선분의 경로 정보를 Path에 담는 작업을 진행할 것입니다.
먼저 Path를 reset하여 시작점이 (0,0)으로 설정되게 합니다. 이후 Path.moveTo로 P2점까지 moveTo 메서드를 이용하여 이동한 뒤,
P2지점까지 lineTo를 이용하여 직선을 그립니다.
이후 곡선을 그리는 경우에는 cubicTo를 이용하여 그리게 되는데 cubicTo의 메서드를 보면 총 6개의 파라미터가 필요합니다.cubic(x1, y1, x2, y2, x3, y3)
(x1, y1) : 곡선의 첫번째 방향점의 x, y 값
(x2, y2) : 곡선의 두번째 방향점의 x, y 값
(x3, y3) : 곡선의 목표점곡선의 모습을 대략적으로 보고 싶은 경우에는 여기에서 간단히 확인해볼 수 있습니다.
이후 두번째 곡선의 경우에도 똑같은 방식으로 그려줍니다. 이후에는 도형의 나머지 부분에 대해 Path작업을 해줍니다.
특히 마지막 점의 경우에는 close를 사용하게 되면 마지막점과 시작점이 자동으로 이어지게 됩니다.override fun onDraw(canvas: Canvas) { super.onDraw(canvas) canvas.drawPath(mPath, mPaint) }마지막으로는 작업할 canvas에 이전에 지정한 Path정보와 Paint정보를 가지고 도형을 그려주는 작업은 onDraw에서 진행해 줍니다.
위의 소스코드는 깃허브에 올려놨습니다.
세계 최강을 꿈꾸는 안드로이드 Front-End 개발자입니다.
Github 주소: github.com/rkswlrbduf
이전 블로그 주소: blog.naver.com/rkswlrbduf => 블로그 이전중...
'안드로이드' 카테고리의 다른 글
Android App With Multi Module (0) 2019.04.18 ViewPager와 PageTransformer를 활용한 Intro Screen (0) 2019.04.16 아키텍처 패턴 - RAW, MVC, MVP (1) 2019.04.12 안드로이드 생명주기-Android LifeCycle (0) 2019.04.12 Android Q - RoleManager (0) 2019.04.12 댓글